
Since Debian powers a large percentage of web servers all over the world, in this article we will explain how to install the LAMP stack on Debian 11 and also works on older Debian 10 and Debian 9 releases.
This will allow system administrators to set up brand new web servers on top of Bullseye using the recent updates to the distribution’s official repositories. It is assumed that you have installed Debian 11 minimal server on a bare metal, virtual machine, or VPS, or have upgraded from Debian 10 to Debian 11.
Installing LAMP Stack on Debian
The “M” in LAMP stands for MariaDB or MySQL, the database server for the stack. Depending on your choice, you can install the database server and the other components (the Apache web server and PHP) as follows.
Install LAMP with MariaDB on Debian
# apt update && apt install apache2 mariadb-server mariadb-client mariadb-common php php-mysqli
Install LAMP with MySQL on Debian
# apt update && apt install apache2 mysql-server mysql-client mysql-common php php-mysqli
As a personal preference, I will use MariaDB in the rest of this article.
Once the installation is complete, let us make sure all the services are running. If so, the following commands.
# systemctl is-active apache2
# systemctl is-active mariadb
should return active for both. Otherwise, start both services manually:
# systemctl start {apache2,mariadb}
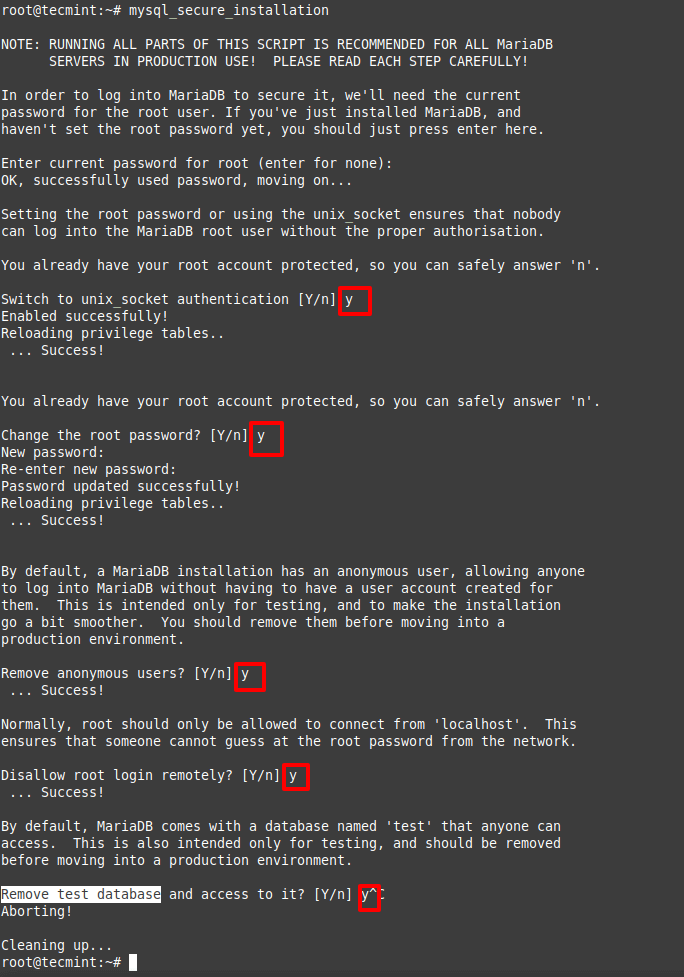
Securing MariaDB in Debian
Finally, before proceeding let’s use mysql_secure_installation to set up the password for the database root account, remove anonymous users, disallow root login remotely and remove test database.
# mysql_secure_installation
Testing LAMP on Debian
To begin, we are going to create and populate a sample database. Next, we will use a basic PHP script to retrieve a set of records from the database in JSON format.
Finally, we will use Firefox’s developer tools to verify the version of Apache being used. Although we could find out this same information with.
# apache2 -v

Server version: Apache/2.4.51 (Debian)
Server built:   2021-10-07T17:49:44
the reason why we’re using a script is to make sure all the components of the stack are working properly when bundled together.
Creating and Populating a Database
Let’s enter the MariaDB prompt with the following command.
# mysql -u root -p
and enter the password that was chosen in the previous section.
Now we will create a database named LibraryDB as follows:
MariaDB [(none)]> CREATE DATABASE LibraryDB;
and add two tables named AuthorsTBL and BooksTBL:
MariaDB [(none)]> USE LibraryDB;
CREATE TABLE AuthorsTBL (
AuthorID INT NOT NULL AUTO_INCREMENT,
FullName VARCHAR(100) NOT NULL,
PRIMARY KEY(AuthorID)
);

MariaDB [(none)]> CREATE TABLE BooksTBL (
BookID INT NOT NULL AUTO_INCREMENT,
AuthorID INT NOT NULL,
ISBN VARCHAR(100) NOT NULL,
Title VARCHAR(100) NOT NULL,
Year VARCHAR(4),
PRIMARY KEY(BookID),
FOREIGN KEY(AuthorID) REFERENCES AuthorsTBL(AuthorID)
);
For security reasons, we will create a special account to access our database:
MariaDB [(none)]> CREATE USER 'librarian'@'localhost' IDENTIFIED BY 'Today123';
MariaDB [(none)]> GRANT ALL PRIVILEGES ON LibraryDB.* TO 'librarian'@'localhost';
The last step now consists of populating the tables with Authors and Books:
MariaDB [(none)]> INSERT INTO AuthorsTBL (FullName) VALUES ('Paulo Coelho'), ('Isabel Allende'), ('Jorge Luis Borges');
MariaDB [(none)]> INSERT INTO BooksTBL (AuthorID, ISBN, Title, Year) VALUES
(1, '9788576653721', 'El alquimista', '1988'),
(1, '9780061194740', 'El peregrino', '1987'),
(2, '9789500720380', 'La casa de los espiritus', '1982'),
(3, '9789875666481', 'El Aleph', '1945');
Testing Database Connection with PHP Script
The following PHP script will first connect to the database and retrieve the records that match the query. If an error occurs, a descriptive message will be displayed so as to give us a hint on what’s wrong.
Save the following script as booksandauthors.php under /var/www/html:
<?php
	// Show PHP version
	echo "Current PHP version: " . phpversion() .  "\r\n";

	// Connect to database
	$connection = mysqli_connect("localhost","librarian","Today123","LibraryDB") or die("Error " . mysqli_error($connection));

	// SQL query
	$sql = "SELECT A.ISBN, A.Title,
        	A.Year, B.FullName
        	FROM BooksTBL A JOIN AuthorsTBL B
        	ON A.AuthorID = B.AuthorID;";
	$result = mysqli_query($connection, $sql) or die("Error " . mysqli_error($connection));

	// Populate an array with the query results
	$libraryarray = array();
	while($row = mysqli_fetch_assoc($result))
	{
    	$libraryarray[] = $row;
	}

	// Convert to JSON
	echo json_encode($libraryarray);
?>
Change the ownership to www-data and add the appropriate permissions:
# chown www-data:www-data /var/www/html/booksandauthors.php
# chmod 600 /var/www/html/booksandauthors.php
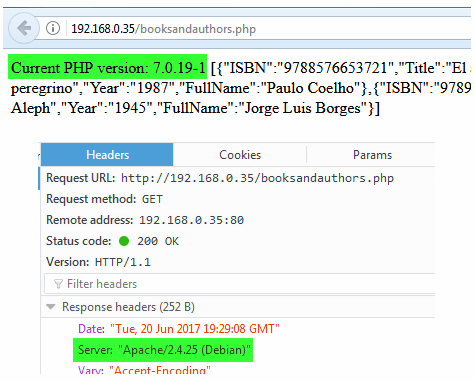
Finally, open a web browser and point it to the URL where the script resides.
http://192.168.0.35/booksandauthors.php
That’s it! In this article, we have explained how to install and test the LAMP stack on Debian 11. If you have questions or comments about this article, don’t hesitate to let us know by using the form below.
Leave a Reply